In today’s internet, SSL / HTTPS certificates are very important for websites. With SSL / HTTPS certificates, the transfer of data between your device and the website will be in encrypted form and hence prevent a third party from leaking your confidential data. Major browsers like Google Chrome and Mozilla Firefox have taken steps to inform users if a website is not secured with SSL certificate. In this blog post, I will show you how to enable free SSL on your Blogger blog and make it secure.
Table of Contents
Activating SSL / HTTPS in Blogger blogs
Blogger has made it as easy as possible to enable HTTPS for your blogs. The process of enabling HTTPS is just a matter of clicking some buttons. Let’s find out how to enable HTTPS for Blogger blogs both using blogspot.com domain and custom domain name.
Steps to enable HTTPS on Blogspot domain
By default, Blogger has already enabled HTTPS on the free blogspot.com domain. So you don’t have to do anything about it. However, there is a small additional step you have to do to ensure every visitor to your blog will be served via HTTPS.
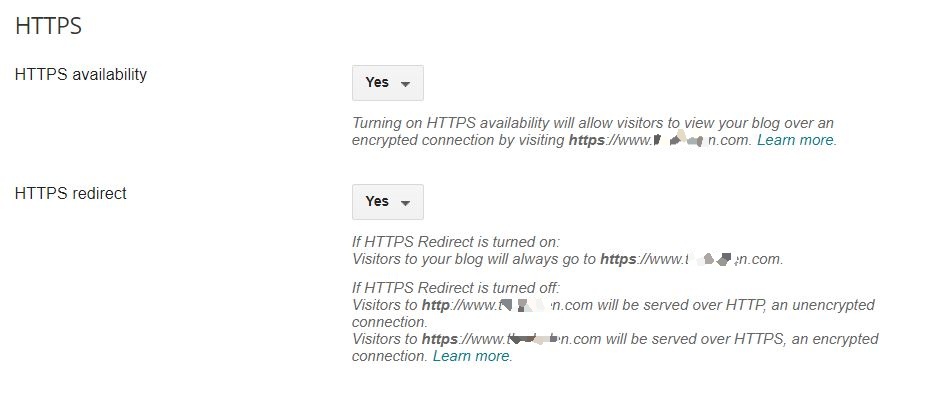
On your Blogger dashboard, go to Settings > Basic > HTTPS. In that section, you will see an option to enable or disable HTTPS Redirect.

Basically, you need to keep it enabled. So select Yes on the option. What this does is that, even if a visitor tries to access your blog via unsecured URL like http://your-blog.blogspot.com, they will be automatically redirected to the secure URL, i.e. https://your-blog.blogspot.com.
Steps to enable HTTPS on custom domain
To successfully enable HTTPS on custom domain in Blogger blogs, first you need to ensure your domain is properly linked to Blogger. You may refer to the custom domain setup guide for Blogger here.
If the domain is properly linked, you should see option to enable HTTPS. Go to Settings > Basic > HTTPS. You should see two options: HTTPS Availability and HTTPS Redirect.

Just keep them selected to Yes.
When you are enabling the HTTPS on custom domain, it might take around 15 mins to an hour for the SSL to be deployed for your domain. After HTTPS is enabled, make sure that HTTPS Redirect is also selected to Yes.
Conclusion
I hope this guide was helpful for you. This may be a fairly simple process for most of you out there. However, if you run into any issues with enabling HTTPS, just make sure your domain is properly connected with all the necessary DNS records and you may also check out the official guide from Blogger about enabling HTTPS here.
And as always, if you need my help with this issue, just leave a comment down below.


Leave a Reply